Interface tour
The areas of the editor and where to find each tool.
The 3D scene fills the entire window and continues behind the translucent sidebars. Opening or closing a sidebar shifts the framing area and controls; the tool dock stays centered at the bottom of the free space. The editor needs at least 1280 × 720 px; 1440 × 900 px leaves more room for the model and its controls.
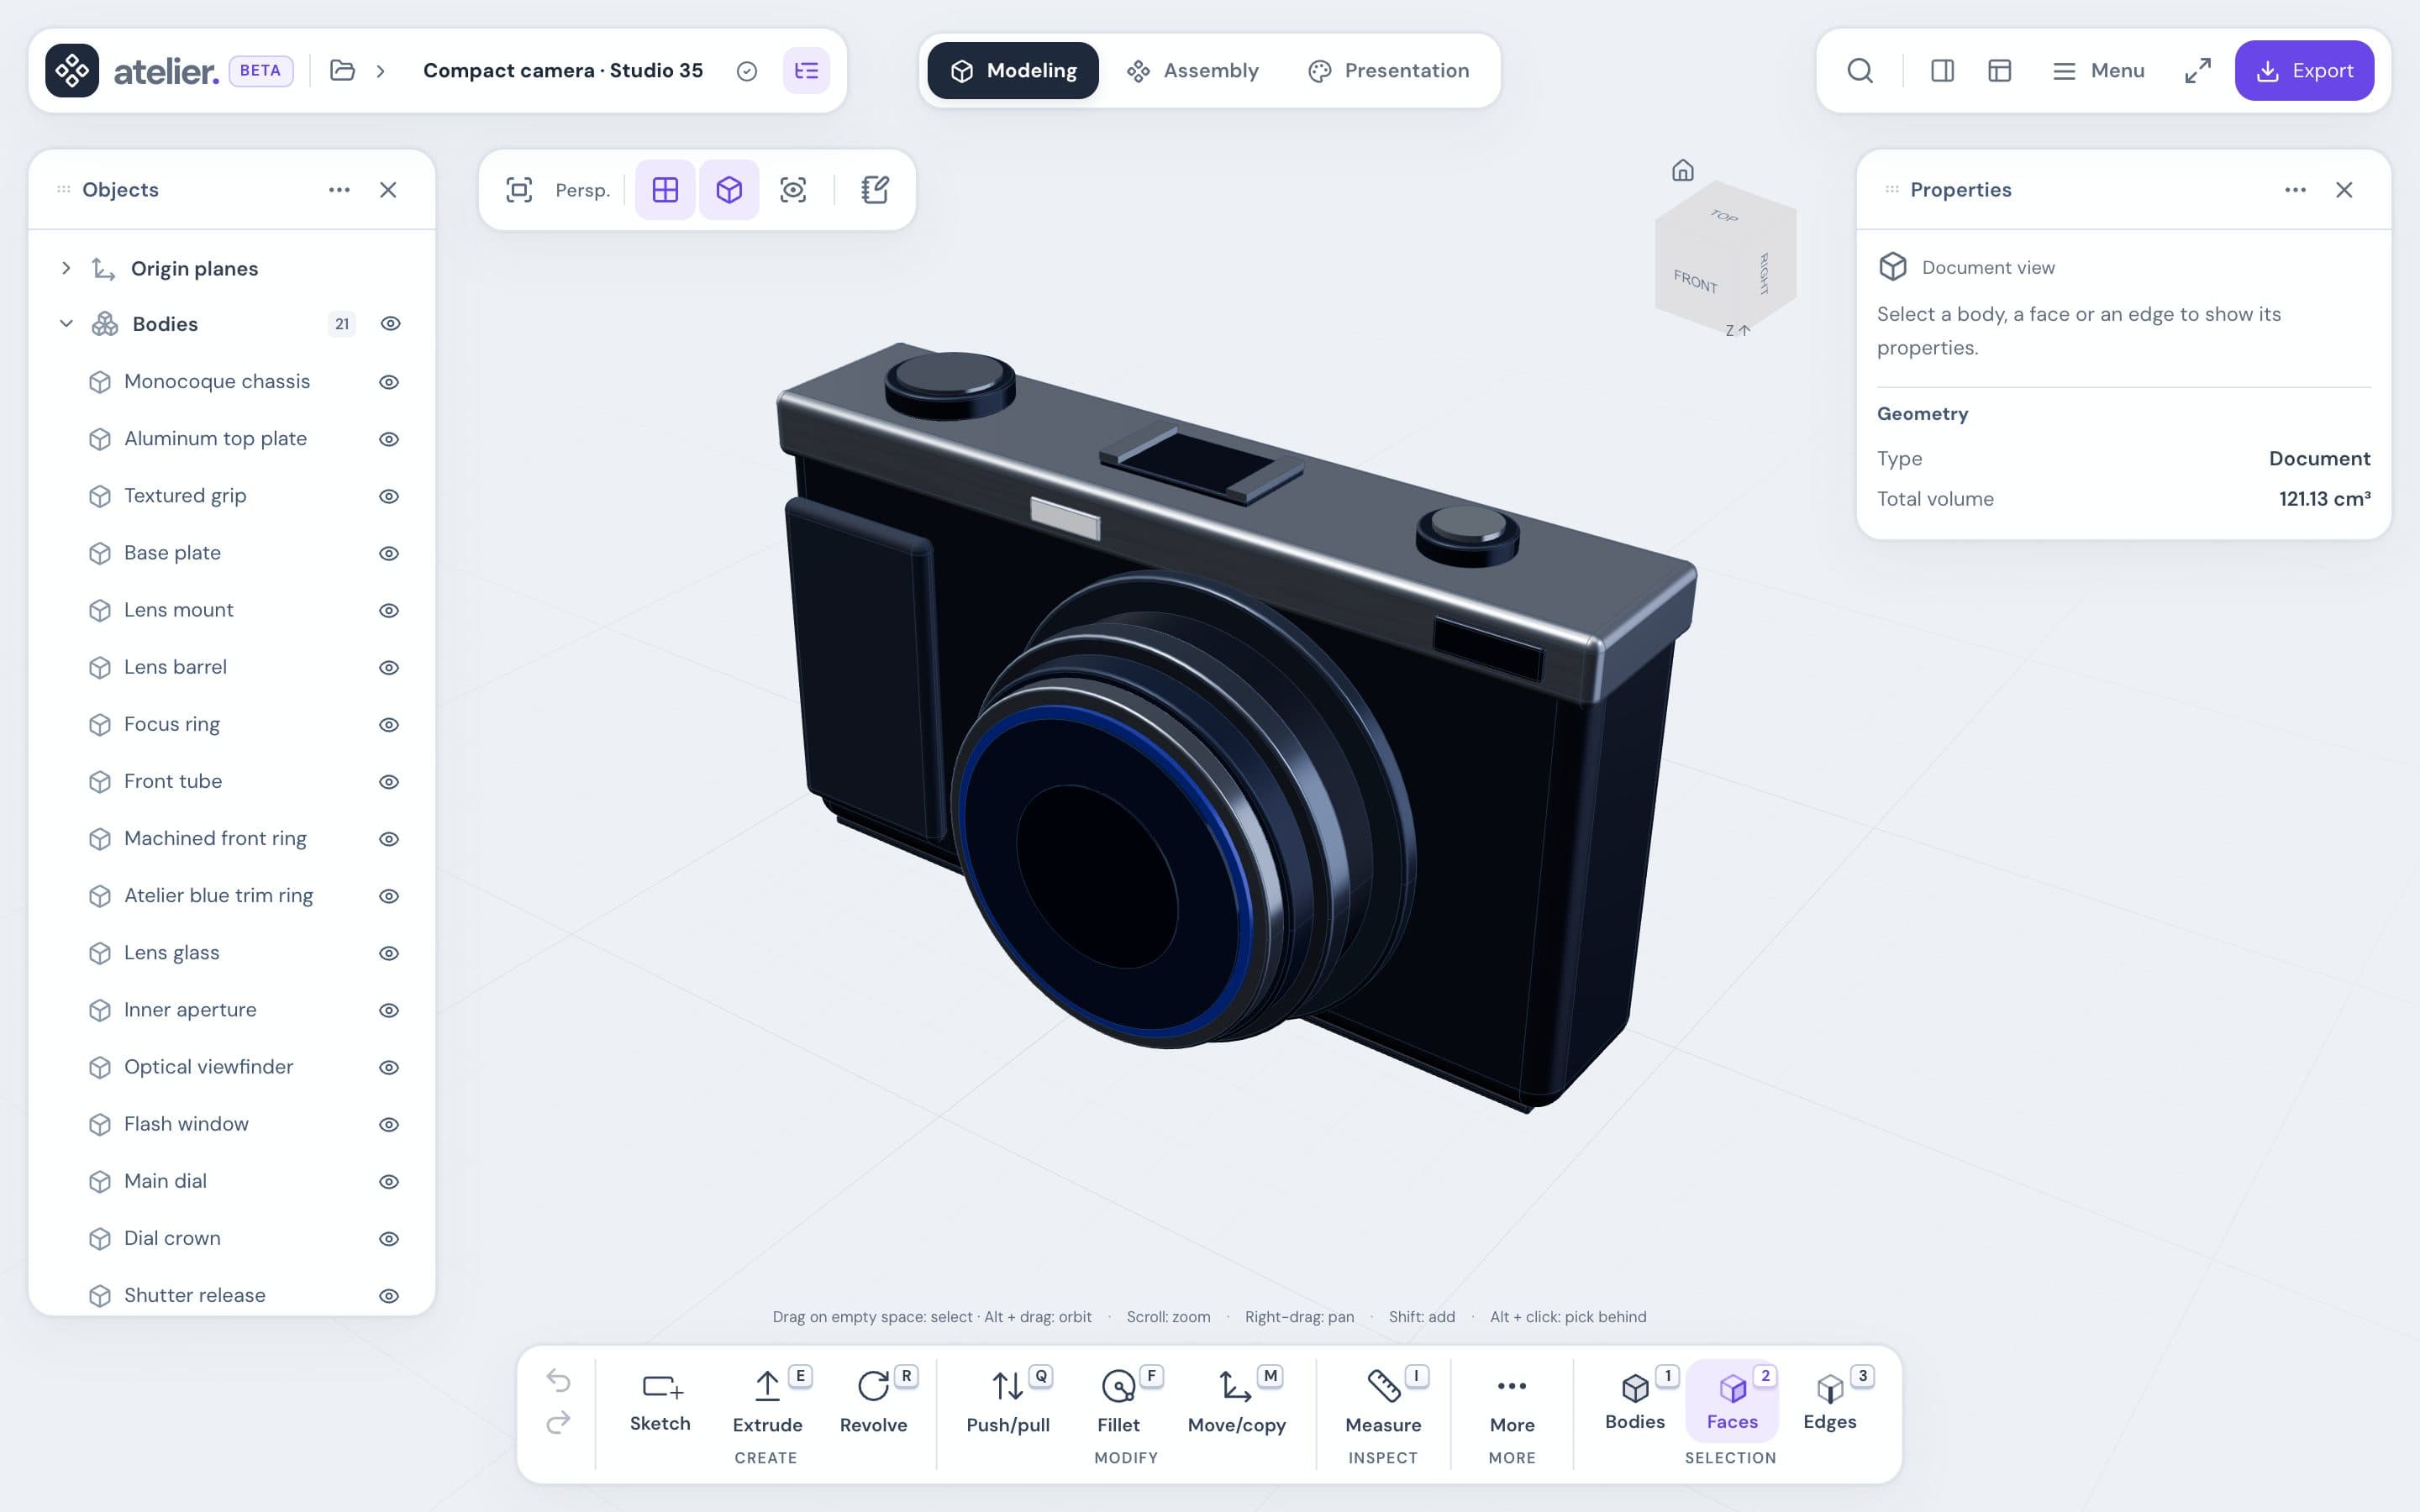
The header
| Item | What it does |
|---|---|
| Atelier logo | Saves the project and returns to the home page. |
| Project name ▾ | Opens the project menu: Rename project, Project versions, My projects, New project and Import a file. The save status appears underneath. See Projects and saving. |
| Modeling / Assembly | Chooses geometry or placement tools. With a linked part selected, Modeling opens its source; Assembly returns to the assembly. |
| Return to assembly | Returns to the assembly after Edit part. This button appears while a part is being edited. |
| Magnifying glass | Opens Search commands. |
| Share and comment | Shares the project once you’re signed in. See Collaboration. |
| Export | Saves the model to a file. See Import and export. |
| Settings | Panel layout, full screen, theme, Language, Help and shortcuts, Documentation and account. |
Document tabs
The document tab bar and creation of new tabs are temporarily disabled. Existing saved documents are preserved. The switch at the top lets you move between Modeling and Assembly.
Select an assembly part and choose Edit part from the dock, context menu or properties. Linked parts open their source tab; local parts return to their fabrication coordinates. Return to assembly in the header restores placements and rebuilds linked parts.
Appearance, available from either document type, opens materials, lighting and background without changing the tools or the parts’ pose. See Appearance and rendering.
While sketching, the sketch toolbar replaces the dock.
Navigate the view
- Zoom: scroll wheel.
- Orbit: drag on the part.
- Pan: right-click and drag.
- Orient: click one of the cube’s 26 facets in the top-right corner: 6 faces, 12 bevels and 8 triangular corners. Each facet highlights on hover.
- Rotate freely: drag the cube. Framing and zoom stay unchanged; Escape restores the starting orientation during the gesture.
- In a planar view, the two arrows turn the view by 90°. Double-click the cube to return to the isometric view. From the keyboard, tab to the cube, use the arrow keys to rotate and Enter to reset.
- Three-quarter view: Views → Isometric, beside the view cube.
Adjust the display
The Fit, Views and Display controls sit together beside the view cube:
- Fit (Home): fits the view to the part.
- Views: standard orientations and saved views.
- Display: Perspective or Orthographic projection, Grid, Edges, Sketches, X-ray and Annotations. Sketches hides every sketch at once, apart from the selected one, without changing each sketch's own visibility.
- Display → Section view: opens the section settings. Section active stays visible beside the controls while a section is enabled.
The tool dock
The dock, at the bottom, starts with Undo and Redo, then shows the tools of the active workspace.
| Workspace | Dock tools |
|---|---|
| Modeling | Sketch, Extrude, Revolve, Push/pull, Fillet, Move/copy, Measure |
| Assembly | From Atelier, Import, Joint, Interference, Section view |
| Both | Appearance opens visual settings. Export offers PNG capture. |
The Auto ▾ menu at the top of the canvas chooses the selection mode: Auto, Bodies, Faces or Edges.
More opens the other tools, sorted by category: Shell, Chamfer, Parameters, Drawing… See Operations.
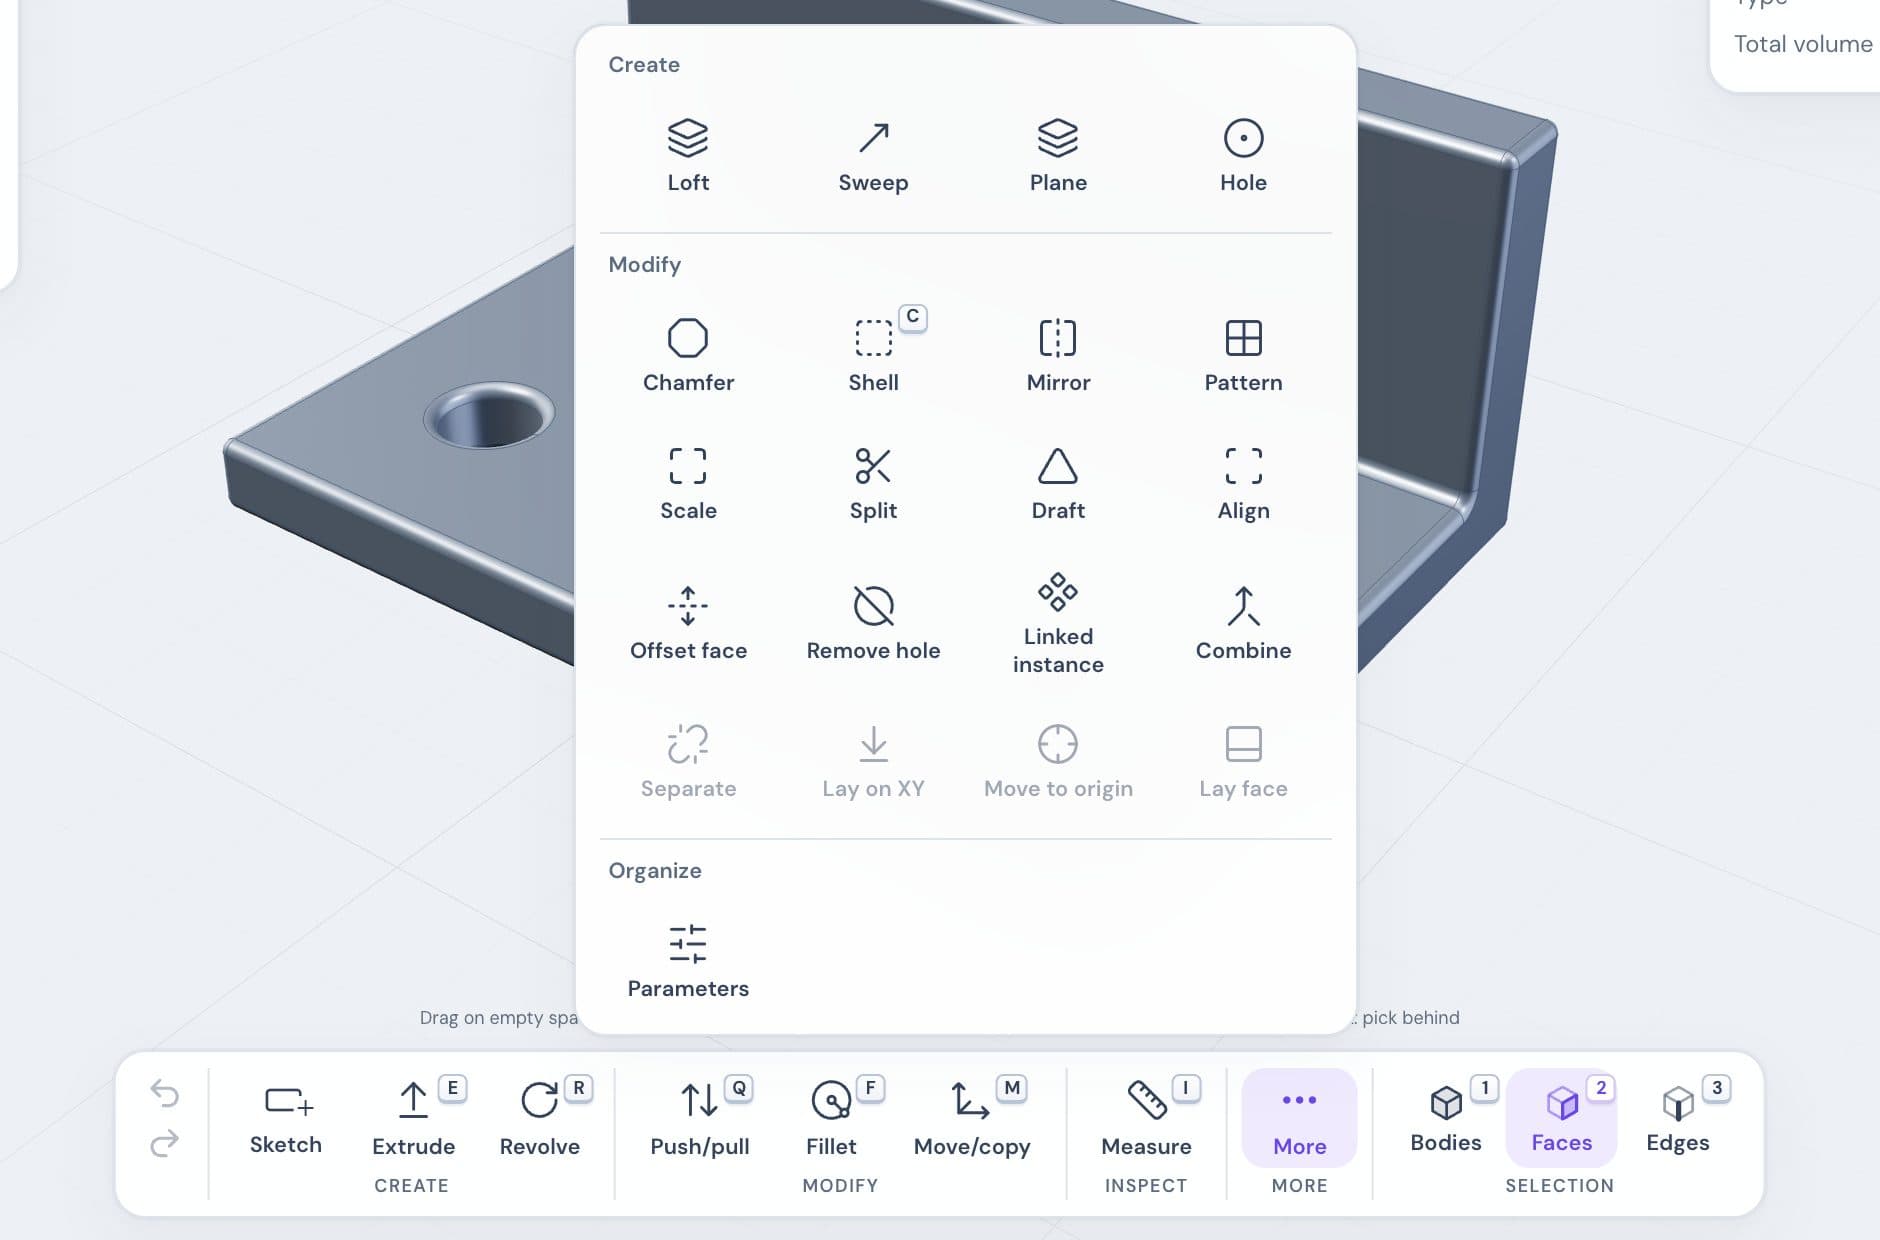
The panels
| Panel | Contents |
|---|---|
| Objects | Bodies, sketches and construction references. In Assembly: parts and joints. |
| History | The operations, in order. See History. |
| Appearance | Materials, studio lighting and background. |
| Properties | Type, dimensions and material of the selection. Operation details have their own panel. |
Saved views
The Views menu beside the view cube keeps viewpoints: camera, projection, section, grid, edges and annotations.
- Save the current view creates a saved view and lets you name it. Click a view to go back to it.
- Its … menu offers Rename, Replace with the current view and Delete the view, separated at the bottom.
Arrange the panels
Objects opens on the left at startup. History has its own right sidebar, opened with the clock button at the canvas edge. Both panels can stay open together. Properties also uses the right column when requested; selecting a face or edge does not open it automatically.
History lists operations in construction order. Expand a step’s chevron to see its inputs: profile, target body, affected edges or faces, and construction mode. Edit opens the operation settings. Its … menu also offers suppression, reordering and deletion. Hovering or selecting a step highlights its geometry; selecting an object filters linked operations. The header’s magnifying glass searches operations.
- Sidebars use the full height below the header. Opening one reserves a framing area and smoothly shifts the view controls and bottom tools together. The background and geometry continue behind their glass.
- Drag the inner edge to change its width. The edge also supports keyboard resizing: left/right arrows, Shift for finer steps, and Home/End for the limits.
- Settings → Panel layout shows or hides panels, chooses Left or Right, or resets the layout.
- When a side contains multiple panels, all their icons stay visible at the canvas edge so you can switch directly between them. Violet marks the displayed panel; click its button again to hide it. A single panel’s button reappears when hidden. Tooltips describe each action on hover or keyboard focus; temporarily unavailable controls stay disabled. Panels preserve their width, expanded details and entered values.
Each side displays a single panel, without tabs. Opening another panel hides the previous one; closing the new panel leaves that side empty. Settings are retained, and closing an operation’s details preserves its draft.
The rail separates the permanent Objects, History and Properties controls from open tool panels. Opening Appearance, Section view, Measurements or another tool adds its icon to the second group on its chosen side. Switching to another panel or clicking the active icon hides the panel and keeps its icon. Closing with the cross removes the tool’s icon; its usual command opens it again. Permanent controls remain available. Contextual icons, such as the sketch plane picker, also disappear when their tool ends.
To close a hidden panel, right-click its icon and choose Close panel. The displayed panel stays unchanged. From the keyboard, focus the icon and press Shift + F10 to open the same menu; Escape dismisses it without changing anything.
Search commands
Press S or click the magnifying glass. In a sketch, the magnifying glass is also in the sketch toolbar and S opens the sketch commands. Type a name or intent in English or French, such as “fillet”, “round edges” or “congé”. Use the arrow keys and Enter to run a matching command.
An empty field shows recent commands from the current workspace first. Unavailable commands explain their prerequisite and can be focused with Tab without running them.
The action card
- Click a face or an edge in Auto, or double-click its body. The strip above the dock names the suggested action, selection and gesture. The dimension stays beside the handle. Actions opens the relevant alternatives, also available by right-clicking.
- An edge offers a fillet at the clicked point; a planar face offers push/pull; a body offers movement. Suggested changes nothing. Drag the handle or click its dimension, inspect the preview, then Apply to keep it or Cancel to discard it.
- Details opens the options even before dragging. At zero, this prepares the operation without changing the part. Closing those details keeps the values and returns to the quick controls.
- In Assembly, a part’s card offers Link…, Fix part…
- Alt + click lists the items under the pointer, to reach a hidden face.
See Selection and measurements.
Change the theme or language
Settings → Interface theme, then Light, Dark or System.
Settings → Language, then English or Français.
All the keys are in Keyboard shortcuts.